How to shrink yourself in ps and how to get screen shots in PS
So I have often seen people look super skinny in photos when in fact in real life they are slightly larger.
I always was curious about this trick-especially since I am still 10 pounds heavier than my old "oh geez-I better clean up my eating this minute i can't believe i weigh this much" weight.
Well folks after watching a few you tube videos and playing around, I think I may have figured it out.
Do you want to see?
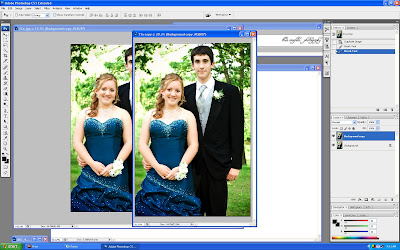
Now this is also helpful when you get a bad angle of one person and you want to make them look like they really do in person. This is what I did with this prom pic.
Ok I just searched and searched online to find out how to get a screen shot. As usual, I found a few little tips but had to play around and explore ps to figure it out. Play folks. Always play around in PS. You will learn so much more this way. By the way-to get a screen shot in PS fill your work space in PS with the image you are working on. Then press the print screen button. Now go to File>New and just let it be the size it says. This will be the size of your work space. Now go to Edit>Paste and the screen shot will paste right into the new document. Then save for web. Viola!
Ok, once again I now see I did a few things in weird order but I don't have time to go do it over.:
Open the photo you want to work on. make sure you are in brush mode-with 100 percent opacity. With this one I used a soft brush which means when you click on the brush drop down menu-the hardness is all the way down. This blurs the outline. You may want to try this with hard and soft brushes. I had some weird lines left behind in this process that may have not been there if I used a harder brush.
Now go to the quick mask icon (circled here in red) and paint over the area you want to pull in or pull out:)
I have been including the surrounding area as well a bit. I think this lessens marks being left behind as long as you don't move the outer lines when selected. You will see.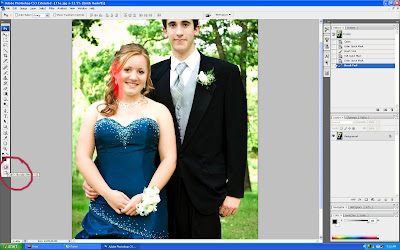 Ok now when you have the area painted- go back to the mask icon and click it again. You should now have marching ants around the outside of the image and the area you painted. Go to Select>inverse Now the ants should just be around the area you painted.
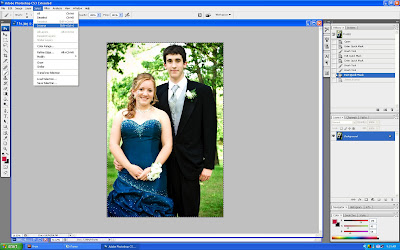
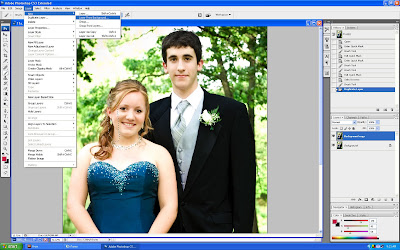
Now you need to duplicate the background layer. You could have done this in the beginning as well. just be sure that you are working on the background copy.
Ok now go up to edit>transform>warp
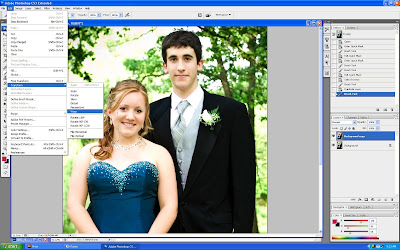 You should get this grid over the selected area.
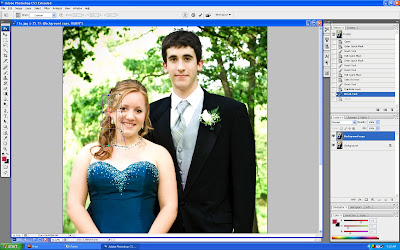
Ok now you will use your mouse to pull parts in. pay attention to the boundaries carefully-that they match up with the unselected parts.
So for this photo I made sure to pick the cheek and neck to pull both in a teeny bit.
Then I made a selection of both arms including the outer waist on both sides up to the top of shoulders and including the right side of her neck. In that next one I had a remnant of her arm left behind on his suit so I went back when done. I clicked on the dropper tool-to click on his suit for the right color. Then I used a small strong briush to paint over the remnant.
What do you think?
I always was curious about this trick-especially since I am still 10 pounds heavier than my old "oh geez-I better clean up my eating this minute i can't believe i weigh this much" weight.
Well folks after watching a few you tube videos and playing around, I think I may have figured it out.
Do you want to see?
Now this is also helpful when you get a bad angle of one person and you want to make them look like they really do in person. This is what I did with this prom pic.
Ok I just searched and searched online to find out how to get a screen shot. As usual, I found a few little tips but had to play around and explore ps to figure it out. Play folks. Always play around in PS. You will learn so much more this way. By the way-to get a screen shot in PS fill your work space in PS with the image you are working on. Then press the print screen button. Now go to File>New and just let it be the size it says. This will be the size of your work space. Now go to Edit>Paste and the screen shot will paste right into the new document. Then save for web. Viola!
Ok, once again I now see I did a few things in weird order but I don't have time to go do it over.:
Open the photo you want to work on. make sure you are in brush mode-with 100 percent opacity. With this one I used a soft brush which means when you click on the brush drop down menu-the hardness is all the way down. This blurs the outline. You may want to try this with hard and soft brushes. I had some weird lines left behind in this process that may have not been there if I used a harder brush.
Now go to the quick mask icon (circled here in red) and paint over the area you want to pull in or pull out:)
I have been including the surrounding area as well a bit. I think this lessens marks being left behind as long as you don't move the outer lines when selected. You will see.
 Ok now when you have the area painted- go back to the mask icon and click it again. You should now have marching ants around the outside of the image and the area you painted. Go to Select>inverse Now the ants should just be around the area you painted.

Now you need to duplicate the background layer. You could have done this in the beginning as well. just be sure that you are working on the background copy.
Ok now go up to edit>transform>warp
 You should get this grid over the selected area.
Ok now you will use your mouse to pull parts in. pay attention to the boundaries carefully-that they match up with the unselected parts.
So for this photo I made sure to pick the cheek and neck to pull both in a teeny bit.
Then I made a selection of both arms including the outer waist on both sides up to the top of shoulders and including the right side of her neck. In that next one I had a remnant of her arm left behind on his suit so I went back when done. I clicked on the dropper tool-to click on his suit for the right color. Then I used a small strong briush to paint over the remnant.
What do you think?


.jpg)


4 Comments:
I think that I am going to pay you to make me skinny in one of my wedding pictures! Better yet - I am going to ask you to take one of me and then not tell me you did it so I think I look gorgeous!! Giggle!
I miss you!!! Will you let me know when it's good for you & I'll call you on the phone!!!
xo
how supurb hon! wow...very impressive... and that shot was great to start with...with those tweaks, she's going to be thrilled...it really did take 10lbs. easy off of her!!!!!! thank you for sharing!
:) xxoo g
whoa-
that is amazing.
we will never have to diet again for a picture-we can just have you take it. hee hee.
seriously though,
it really is interesting.
and i love that you share your tricks here-it is awesome for people like me who are lost in photoshop!!
love you thea,
mccabe xoxo
i have an aversion to reading instructions...but something about reading YOUR instructions is absolutely fascinating! thank you for being such a good teacher. i like learning through you. :)
Post a Comment
<< Home